3D Interactions on the Web for Developers (Three JS)
King Somto
13 Jun 2022
•
7 min read
Introduction
We can all agree that one of the most powerful things that give a powerful effect to any web interface is web animations and interactions. One really great way to take your web views to another plateau is with creative 3d animations and we also see the trends tilting towards high-end 3d models being utilized for production-level web interfaces.
“But, I’m a developer, I don’t know where to start with 3d design”.
Well actually, that has been a strong contemplation with the development space as to how to make creating 3d designs way easier.
Initially, we were greeted with the rise of webGL, but it had a serious learning curve and lots of complexities, which made it harder for developers to jump into the space and start creating 3d geometries. Then with further improvements and further releases, we have our very own THREE.js to the rescue.
Three JS
For more details, please check out their docs here:
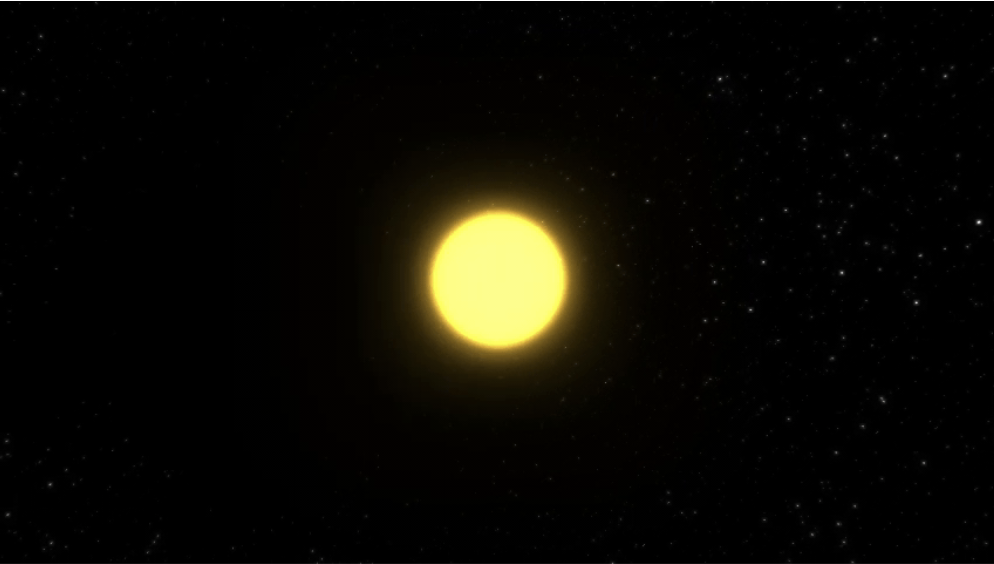
To help us get a hang of what Three JS is about, we will be creating a simple glowing sun, moving around a space.
This tutorial will teach us most of the basic concepts we need to get started with building our own 3d interactions. These basic concepts include:
- Creating a simple scene
- Working with the Camera object.
- Working with the renderer method
- Using Materials and geometry to render 3d objects.
- Using perspective and lighting to give our objects a solid look.
Preface
As a developer, 3D terminologies like perspective, renderers, and scenes, especially for the first time, can be a handful. So here’s a small guide before we get started.
To render any 3d object, we need to have a scene, camera, and renderer
Scene
A scene is basically the area or space in which your 3d object will be rendered. 3d objects do not work the same way as HTML elements, so we will need a special environment that allows us to make use of custom functions and effects that are native to 3d elements.
Camera
A camera works the same way as a regular camera. Just as we have regular objects that are captured in real-time with the camera, the camera object in three-js allows us to capture a rendered scene as the textures and materials get loaded in real-time. The difference here is, that we will need to set some parameters to allow us to streamline where we want our focus, and we will be seeing this shortly.
Renderer
The renderer is responsible for preparing and loading up our 3d models to be displayed on the browser. Typically, the three js library uses the CPU/GPU to process the 3d models, so there might be varying performance when rendering depending on your CPU.
We will get to know more as we build our project.
Getting Started
In your new Project folder, run:
npm init --y
After this is finished, a package.json file will be generated.
Then run the following:
npm install three express
The three-js library will help us to run our 3d development for the web, and we use express because typically, 3d models are to be rendered on a web server. Alternatively, if your code editor can spin up a live server, then you can easily run with it, but creating a web server ensures that the textures are loaded with little performance issues.
After this, we can now start with our 3d modeling. Let’s set up our folder structure:
Create a public folder, and in it, you create a textures folder. This will have the starry background we need for the glowing sun. For this tutorial, I used a picture from Unsplash. Feel free to use any image that would serve as a background for the image.
Next, in our public folder, we create our index.html, styles.css, and index.js files.
The index.html files will hold the canvas, and scripts we will need for the 3d model, the styles will help us to style our page, and the index.js will hold the entire logic we need to render and design our 3d models.
In our HTML file, we will simply initialize our basic HTML template and put it in our scripts.
Index.html
<!DOCTYPE html>
<html lang="en">

<head>
    <meta charset="UTF-8">
    <meta http-equiv="X-UA-Compatible" content="IE=edge">
    <meta name="viewport" content="width=device-width, initial-scale=1.0">
    <title>Glowing Sun Project</title>
    <link rel="stylesheet" href="./styles.css">
</head>
<body>
    <div>
        <canvas class="webgl"></canvas>
    </div>
    <script src="https://ajax.googleapis.com/ajax/libs/jquery/2.0.3/jquery.min.js"></script>
    <script type="module" src="./index.js"></script>
</body>
</html>
In our styles.css, we will simply ensure the body takes a border-box size, and then hide the overflow, so only the canvas details will be rendered
styles.css
* {
    margin: 0%;
    padding: 0%;
    box-sizing: border-box;
  }


  body {
    overflow: hidden;
  }
Now for the main rendering, in our index.js file.
As we discussed earlier, to render our object, we will need a scene, camera, and renderer.
First, we import our libraries
import * as THREE from "/node_modules/three/build/three.module.js";
Then we declare our variables:
let scene;
let camera;
let renderer;
We create a scene by simply pulling an instance of the scene from the Three.js library. This works for our camera and renderer, as well as most methods you will need for rendering.
We will first refer to our canvas from the HTML file, and then on that canvas, we append or add our elements to the view.
const canvas = document.getElementsByTagName("canvas")[0];
scene = new THREE.Scene();
const fov = 60;
const aspect = window.innerWidth / window.innerHeight;
const near = 0.1;
const far = 1000;

//camera
camera = new THREE.PerspectiveCamera(fov, aspect, near, far);
camera.position.z = 8;
camera.position.x = 0;
scene.add(camera);
There are different types of cameras that can be used, but most often, a PerspectiveCamera works best for instances where the field of view is streamlined to a given area. Now, our camera instance needs a few properties to display correctly: for, aspect, near, and far.
To put it simply, for stands for field of view. This value indicates how much of an area is to be visible relative to the origin of the object. We use a for of 60, so the object will be closer to us, and the more this value is increased, the farther away the object will be.
Aspect
Aspect is simply the aspect ratio. We use the window’s inner width and inner height, so we can flesh out the full dimensions of the 3d objects we are using. If we use a static width and height (say 800 x 600), our 3d image will appear jagged or distorted.
Near and far simply works a little with our field of view. Whatever value the near parameter holds, the 3d object will only render the sides of the object that are near to that value as it is being rendered. The same thing goes for the far value. We will see all of these in action.
Now we have our scene and camera added to the canvas. If we run our project, we will not see anything, because we have not added our renderer yet, and also our 3d object to be rendered.
Let’s add our WebGL renderer instance:
//default renderer
renderer = new THREE.WebGLRenderer({
  canvas: canvas,
  antialias: true,
});
renderer.autoClear = false;
renderer.setSize(window.innerWidth, window.innerHeight);
renderer.setPixelRatio(window.devicePixelRatio ? window.devicePixelRatio : 1);
renderer.setClearColor(0x000000, 0.0);
//bloom renderer
const renderScene = new RenderPass(scene, camera);
const bloomPass = new UnrealBloomPass(
  new THREE.Vector2(window.innerWidth, window.innerHeight),
  1.5,
  0.4,
  0.85
);
bloomPass.threshold = 0;
bloomPass.strength = 2; //intensity of glow
bloomPass.radius = 0;
const bloomComposer = new EffectComposer(renderer);
bloomComposer.setSize(window.innerWidth, window.innerHeight);
bloomComposer.renderToScreen = true;
bloomComposer.addPass(renderScene);
bloomComposer.addPass(bloomPass);
Now we have our renderer set up. The auto clear is just a default practice to reset the renderer to its default state. Set size and pixel ratio are to set the size based on the aspect ratio we set our camera, and set clear color is to darken the color of the background once cleared.
Now, we have our canvas set up. Let’s start creating the actual 3d objects.
Any 3d object, at its simplest level, is made up of geometry and a material. Compare it to the real world, every object has a shape (geometry) and a texture (material). So with this in mind, let’s create our object, which is the sun. We can represent the sun by a sphere and then the material can be the default three.js material with a yellow-like color.
//sun object
const color = new THREE.Color(# FDB813");
const geometry = new THREE.IcosahedronGeometry(1, 15);
const material = new THREE.MeshBasicMaterial({ color: color });
const sphere = new THREE.Mesh(geometry, material); //sun using geometry & material
sphere.position.set(0, 0, 0);
sphere.layers.set(1);
scene.add(sphere);

// galaxy geometry
const starGeometry = new THREE.SphereGeometry(80, 64, 64);

// galaxy material
const starMaterial = new THREE.MeshBasicMaterial({
  map: THREE.ImageUtils.loadTexture("texture/galaxy1.png"), //background image
  side: THREE.BackSide,
  transparent: true,
});

// galaxy mesh
const starMesh = new THREE.Mesh(starGeometry, starMaterial);
starMesh.layers.set(1);
scene.add(starMesh);
With this, we now have our sun and stars created in 3d space on the browser. Note that the star material is not a default material but a normal image.
Lastly, we will animate our 3d object, to have that rotation effect. Three JS renders 3d objects at 60 frames per second, so we need a function that can update the state of our 3d object 60 times every second, so it can render appropriately. We do this with the help of the request animation frame hook. Notice, in our animate function, we use a recursive style to continue calling our function so it always updates the state.
//resize listener
window.addEventListener(
  "resize",
  () => {
    camera.aspect = window.innerWidth / window.innerHeight;
    camera.updateProjectionMatrix();
    renderer.setSize(window.innerWidth, window.innerHeight);
    bloomComposer.setSize(window.innerWidth, window.innerHeight);
  },
  false
);
//
//animation loop
const animate = () => {
  requestAnimationFrame(animate);
  starMesh.rotation.y += 0.001;
  starMesh.rotation.x += 0.005;
  starMesh.rotation.z += (0.003 * -1);
  camera.layers.set(1);
  bloomComposer.render();
};

animate();
Now, our 3d object is ready to be rendered. We now need to spin up our server and render the HTML page that holds our canvas. In your root directory, outside the public folder, create a server.js
const express = require("express");
const app = express();
const path = require("path");

app.use(express.static(__dirname + "/public"));
app.use("/node_modules", express.static(path.join(__dirname, "node_modules")));
app.listen(3000, () => console.log("Visit http://127.0.0.1:3000"));
Also in your package.json file, replace the script key-value pair with this:
 "scripts": {
 	"start": "node server.js"
  },
Now when you spin up your server (open your terminal and type in “npm start”), you should see the sun object.
Thanks for reading.

WorksHub
Jobs
Locations
Articles
Ground Floor, Verse Building, 18 Brunswick Place, London, N1 6DZ
108 E 16th Street, New York, NY 10003
Subscribe to our newsletter
Join over 111,000 others and get access to exclusive content, job opportunities and more!