Building React Firebase Chat (Fire Chat) Part 6 (Sharing image resources with firebase storage)
King Somto
7 Jan 2022
•
5 min read

Introduction
Sharing media files is a cool feature that makes chat applications so immersing, the ability to share images and videos in a conversation makes it more adaptive and can help when we need to paint a graphical image, also because its a cool feature to have in a chat, we have been able to build some very cool features with firebase, React and Ionic to be able to build out our mobile applications here are all the tutorials that have led up to this.
Firebase and Ionic React Chat (Fire Chat) Part 1
Building React Firebase Chat (Fire Chat) Part 2
[Firebase and Ionic React Chat (Fire Chat) Part 3](Firebase Functionshttps://javascript.works-hub.com/learn/firebase-and-ionic-react-chat-fire-chat-part-3-firebase-functions-d9619)
[Firebase and Ionic React Chat (Fire Chat) Part 4](Firebase Functions - Building Private Chats https://javascript.works-hub.com/learn/firebase-and-ionic-react-chat-fire-chat-part-4-firebase-functions-building-private-chats-4f67b)
[Firebase and Ionic React Chat app (Fire Chat) Part 5](Creating Read receipts https://javascript.works-hub.com/learn/firebase-and-ionic-react-chat-app-fire-chat-part-5-creating-read-receipts-2278f)
Now for this episode, we are going to build out a feature to let users share image files with the png and jpeg extensions, to do this we need to enable us to use firebase -storage in our codebase.
Let us get down to it.
A complete redesign is needed for our application to do this we need to add 2 new SVG assets to our application this can be selected by you, adding these files to the assets folder and editing the index.js file to export them by making the below code changes.
import {ReactComponent as Tic} from './tic.svg';
import {ReactComponent as SendAsset} from './send.svg';
import {ReactComponent as FileAsset} from './file.svg';

export {Tic,SendAsset,FileAsset}
Now we export the SVG files as components.,
Changing the chat app Ui
The next process would be to edit the src/routes/container.jsx file to contain the below
import React, { useContext, useEffect, useState } from 'react';
import style from 'styled-components';
import { allFunctions, db, storage } from '../config/firebase';
import Messages from '../components/messages';
import { UserContext } from '../providers/userproviders';
import { Redirect } from 'react-router-dom';
import { FileAsset, SendAsset } from '../assets';
import { Camera, CameraResultType } from '@capacitor/camera';


const Box = style.div`

.chatBox{
 height: 100vh;
 width: 100vw;
 margin: 0 auto;
 border-radius: 10px;
 position: relative;
 max-width: 500px;
}

.textFooter{
 position: relative;
 bottom: 47px;
 display: grid;
 left: 0;
 grid-template-columns: 65px 1fr 65px;
 background: white;
 padding-top: 10px
}

input{
   width: -webkit-fill-available;
   height: 52px;
   border: 0;
   padding: 0 10px;
   border: 1px solid silver;
   border-radius: 18px;
}

button{
   width: 60px;
   border: 0;
   height: 52px;
   background: transparent;
}


`;

export default function Container() {
 const { user } = useContext(UserContext);
 const input = React.createRef('');
 const receiver = window.location.href.split('/')[4]
 const [imageToSend, setImageToSend] = useState(false)


 if (!receiver) {
   return <Redirect path='users' />
 }


 const sendImage = async () => {


 }


 return (
   <Box>
     <div className="chatBox">
       <Messages name={user.uid} />
       <div className="textFooter">

         <button
           onClick={async (e) => {

             sendImage()

           }}
         >
           <FileAsset />
         </button>
         <input
           id="input"
           onChange={(e) => {
             input.current = `${e.target.value}`;
           }}
           type="text"
         />
         <button
           onClick={async (e) => {

             if (input.current.length === 0) {
               return
             }

             document.getElementById('input').value = '';

             await allFunctions.sendUserMessage({
               userName: receiver,
               message: input.current
             })

             var element = document.getElementById('messages');
             element.scrollTop = element.scrollHeight - element.clientHeight;

             input.current = ''
           }}
         >
           <SendAsset />
         </button>


       </div>
     </div>
   </Box>
 );
}
Our output would be
Ok, this is nice, very nice! I prefer it to the last Ui we had for the chat interface, We added a new button and a sendImage function to initialize the image sending process, but before we can do all that we have to make sure some API’s/libraries are present on our application.
First would be the @capacitor/camera this library works with capacitor core to install that all we need to do is simply run the following command.
npm install @capacitor/camera
Doing this installs the camera plugin for Capacitor.
Next, we need to work on our send Image function
The process of sending images
Sending an image has 4 processes,
- Extracting the image
- Saving the image in storage Generating the URL Saving that URL as a message and adding a type flag that describes the message as an image

Let’s turn that to actual Code
First, edit the config/firebase.js file to export a storage variable and also make sure we are using the emulator.
firebase.storage().useEmulator('localhost',9199)
////
////
///
export const storage = firebase.storage()
Now let’s write our function for sending images
 const sendImage = async () => {
   const image = await Camera.getPhoto({
     quality: 90,
     allowEditing: true,
     resultType: CameraResultType.Base64
   });


   if (image.format !== 'png' && image.format !== 'jpeg') {
     ///invalid formats
     return
   }

   var imageUrl = image.base64String;
   const imageLoc = `/images/${Math.random()}.${image.format}`
   const uploadTask = storage.ref(imageLoc).putString(imageUrl, 'base64')


   uploadTask.on('state_changed',
     (snapshot) => { },
     error => {
       console.log(error)
     }, () => {
       storage.ref(imageLoc).getDownloadURL().then(async (url) => {
         ///success
         ///got  storage url

         await allFunctions.sendUserMessage({
           userName: receiver,
           message: url,
           type: 'media'
         })
       })
     })

 }
Breaking down the code.#### Part 1
const image = await Camera.getPhoto({
     quality: 90,
     allowEditing: true,
     resultType: CameraResultType.Base64
   });
This section of the code lets us select an image or use the camera and returns the image as an object containing two params base64String and format this is all the information we need.
Party 2
   if (image.format !== 'png' && image.format !== 'jpeg') {
     ///invalid formats
     return
   }
We then make sure we are not sending files that are not image file types, this can later be built to support image size or if you want to be able to share videos too.
Part 3
   var imageUrl = image.base64String;
   const imageLoc = `/images/${Math.random()}.${image.format}`
   const uploadTask = storage.ref(imageLoc).putString(imageUrl, 'base64')
The 3rd section involves us saving the image to our server and creating a task handler for the operation to read the status of our process
Part 4
   uploadTask.on('state_changed',
     (snapshot) => { },
     error => {
       console.log(error)
     }, () => {
       storage.ref(imageLoc).getDownloadURL().then(async (url) => {
         ///success
         ///got  storage url

         await allFunctions.sendUserMessage({
           userName: receiver,
           message: url,
           type: 'media'
         })
       })
     })
Part 4 enables us to be able to get image Url after upload and save that image Url as our message with the type flag.
A slight change in our sendUserMessage firebase function
export const sendUserMessage = functions.https.onCall(
  async ({userName,message,type='text'},context) =>{

      let user: any = false;
      try {
          const tokenId = (context.rawRequest.headers['authorization'] || '').split(
              'Bearer ',
          )[1];
          console.log({ tokenId });

          if (!tokenId) {
              throw new Error('Cant find user');
          }
          const usersRef = admin.firestore().collection('users')

          user = await auth().verifyIdToken(tokenId);
          ///get this user username

          if (!user) {
              throw new Error('Cant find user');
          }


          const checkUserNameIsUsed = await (await usersRef.where('userName', '==', userName).get())
          console.log({checkUserNameIsUsed : checkUserNameIsUsed.docs,userName})


         const chatId =  combineTwoIds(checkUserNameIsUsed.docs[0].id,user.user_id)

          admin.database().ref('chats').child(chatId).push({
          message,
          sender: user.user_id,
          type
         })

         return {
             message:'sent'
         }


      } catch (error) {
          console.log(error)
          return {
              error: true,
              message: 'Failed to send message',
          };
      }
  }
)
We enable our application to save the type variable in our messages.
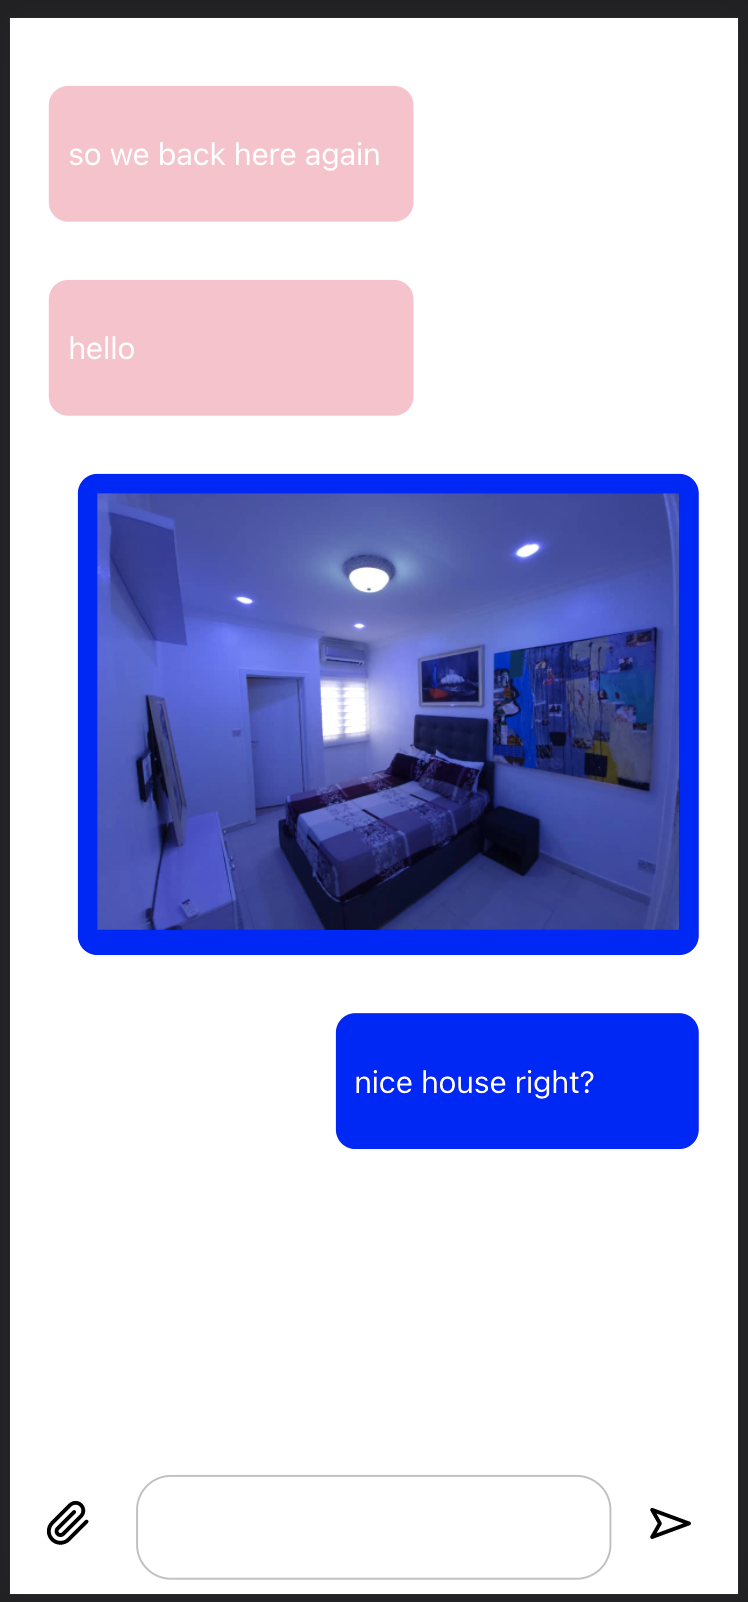
Displaying images
Now we can save our images next step would be to display them
Simply going to the component that renders messages and adding the following
 const { message, type, id, sender, ...rest } = data;
*****
*****
****
{type !== 'media' ? <p>
     {message}
   </p> : <img src={`${message}`} />}
   {seen && sender === name && <Tic />}
In the code above we conditionally render an image if the type is an image or we render a text.
Let’s check out our output
😊😊😊😊.
I think we did it, we built an amazing application just from the ground proving that big applications are just blocks of smaller things put together in ways that can scale, re-editing approaches to solving problems multiple times depending on the problems at hand.
Conclusion
We have been able to build a solid application with firebase, that leverages every single aspect of firebase from database to cloud-functions and now storage firebase recruiters, if you read this, am always available for a new job. We have been able to see how images are sent from one user to another, different companies or products would have different implementations for this depending on the product, but this can be built on to create a more complex implementation.

WorksHub
Jobs
Locations
Articles
Ground Floor, Verse Building, 18 Brunswick Place, London, N1 6DZ
108 E 16th Street, New York, NY 10003
Subscribe to our newsletter
Join over 111,000 others and get access to exclusive content, job opportunities and more!