The Ultimate Guide: How To Launch A Security Token With Polymath (Part 1)
Pablo Ruiz
9 May 2018
•
11 min read

A few weeks ago we introduced “Toro”, which is the first step into enabling the issuance of regulatory-compliant securities tokens.
In this article series I will go over the process of issuing your first security on the Ethereum network by using the smart contracts we deployed on Ropsten testnet as a playground for testing the Polymath framework.
This three part step-by-step guide is going to be more technical than the articles Polymath usually releases as we are going to go over the process of deploying smart contracts without any User Interface. We’ll soon be releasing tools to empower less technical users to join the asset tokenization revolution.
WARNING: Over the past few days there have been some reports of MyEtherWallet being hacked. If you are afraid of using MyEtherWallet to interact with the contracts, consider switching to MyCrypto. They have the same user interface so the screenshots and instructions still apply.
Polymath Toro Smart Contracts on Ropsten Testnet
Following the release of Toro, we launched this latest release on Ropsten testnet. The smart contracts have been deployed to the following addresses and verified on Etherscan:
- TickerRegistry: 0x0abeafae9333f7dc64959914f67765edee5fd05f
- SecurityTokenRegistry: 0x8e736d9caeb9eb9b7a766c196fbb01eb53344e81
- CappedSTOFactory: 0x423105526255dB03C36FD763C982daD96B95D17e
We also “issued” a security token with the symbol “TORO” to play around with it. You can find the TORO token contract and its STO contract here:
TORO Token: https://ropsten.etherscan.io/token/0x7456F707Ac3B3B9a728cb0506D79DA4D5B70798C#balances
TORO’s Capped STO: https://ropsten.etherscan.io/address/0x6b7cC0C10a0838f8562257c8e227E8De057cB537

Issuing your own Security Token with Polymath Toro
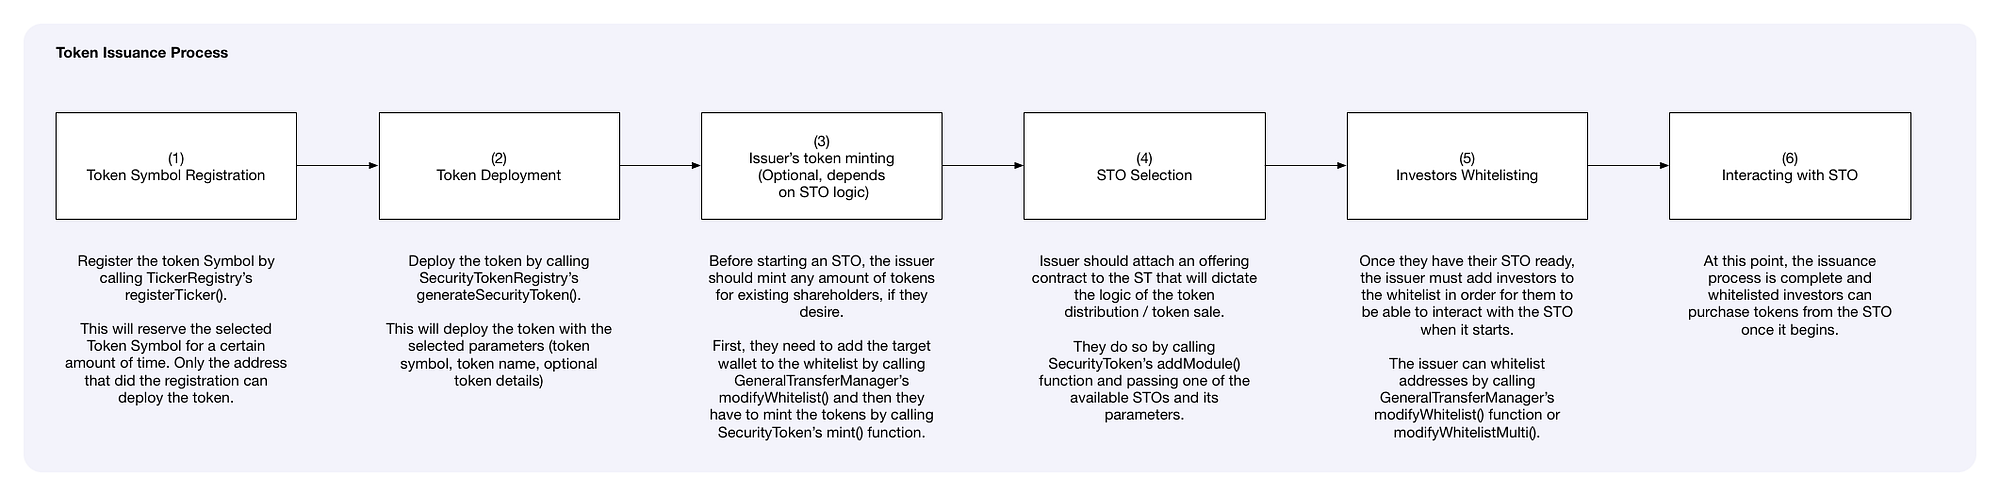
Issuing a security token with Polymath only takes 5 steps:
- Registering the token symbol
- Deploying the token without any initial supply
- Minting (creating) tokens for existing shareholders, which is optional
- Launching the Security Token Offering (STO)
- Whitelisting investors so they can purchase tokens in the STO
For the sake of completeness, we are also going to cover the process of having a whitelisted investor buy tokens in the STO we create.
In this first part of the step-by-step guide we will cover the first two steps: Registering a token symbol and deploying the actual token to testnet.
Registering Your Own Token Symbol
The first step of issuing a security token with Polymath is registering your Security Token Symbol — “ticker” — on Polymath’s TickerRegistry contract.
The TickerRegistry contract allows users to register their preferred token symbols. Registering a token symbol means that no one else will be able to take it while the issuer completes the necessary steps to deploy the actual token.
By default, in Toro, the issuer has 7 days to take action on their symbol and deploy the token. Once this period lapses, the token symbol is no longer reserved and becomes available for others to register.
Registering a token symbol requires the issuer to call the following method on the TickerRegistry (0x0abeafae9333f7dc64959914f67765edee5fd05f) contract:
The registerTicker method receives 4 parameters:
address _owner: the account that will own the ticker symbol. Typically, it would be the same account calling this function, but the caller might want to register the ticker on behalf of someone else, like a business associate or employer.string _symbol: The token symbol to register. For example: TORO.string _tokenName: The name of the token being registered. For example: The Toro Company.bytes32 _swarmHash: Used to store additional off-chain data if ever needed. Can be empty.
Once this method is executed, a new token symbol will be added to the TickerRegistry. From then on, its owner has a few days to complete the token issuance process before the token symbol expires on the Token Registry.
Let’s get our token symbol registered now, before someone else takes it! 🏃
Interacting with Smart Contracts Using Metamask and MyEtherWallet
Throughout this step-by-step guide we are going to be interacting with the Polymath smart contracts deployed on Ropsten testnet. In order to complete these steps, we need to be able to execute transactions on the smart contracts. One of the methods for doing so is by using MyEtherWallet (MEW) to access your Ethereum account, sign transactions and execute them with the help of the Metamask Chrome Extension
There are a lot of tutorials out there on how to use Metamask and MyEtherWallet to interact with smart contracts, so this isn’t going to be a full primer on how to do that, as it would take an entire post to explain the complete workflow.
Let’s register our token symbol together by following the steps described below:
Step 1: Make sure you have Metamask installed on Chrome and that you already have an account unlocked on Ropsten testnet with some Ether. You can check this tutorial for a quick intro on how to connect Metamask to Ropsten testnet and how to get Ether.
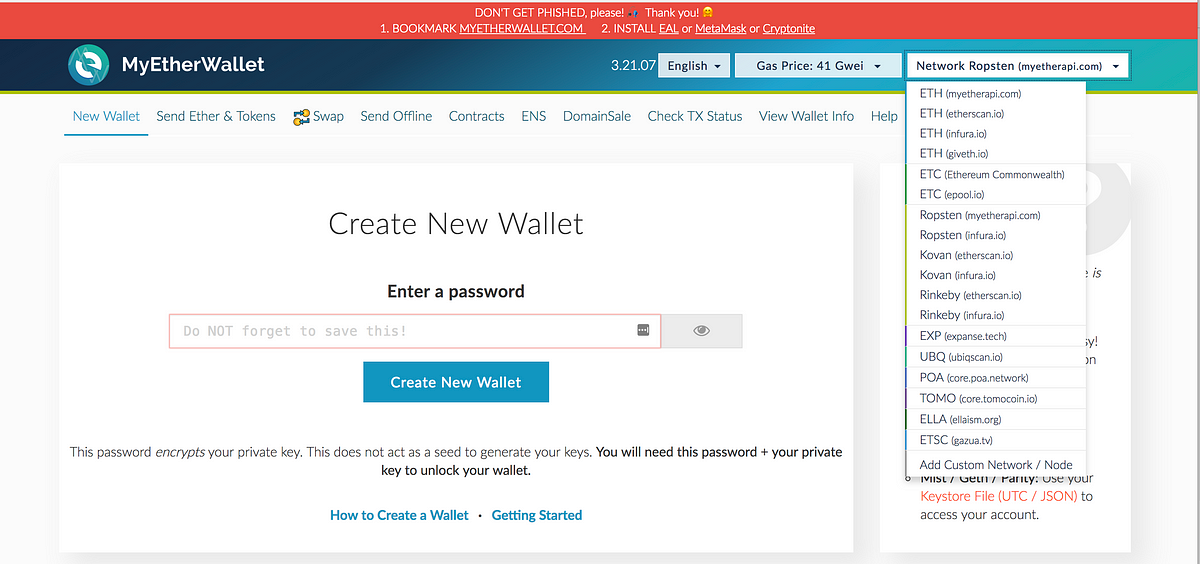
Step 2: Go to MyEtherWallet and switch to Ropsten testnet by selecting it on the top right bar on MEW’s homepage. (By default, MEW will connect to mainnet).
Step 3: Next, whenever you want to interact with a deployed smart contract, go to the “contracts” section. There, you will need to enter the address where the smart contract has been deployed along with the contract’s ABI (Application Binary Interface). The ABI of a contract allows us to communicate with the smart contract from the “outside” by providing a definition of what its functions are and what data these functions return when executed.
Step 4: In order to interact with a smart contract we need to know its Contract Address and ABI. Generally, smart contract addresses and their code are made public by their developers so users can look at them and know that these contracts perform as advertised. Developers will usually use Etherscan’s verification process to make the code public and, if the contract has been verified, you will also be able to easily get the ABI from there.
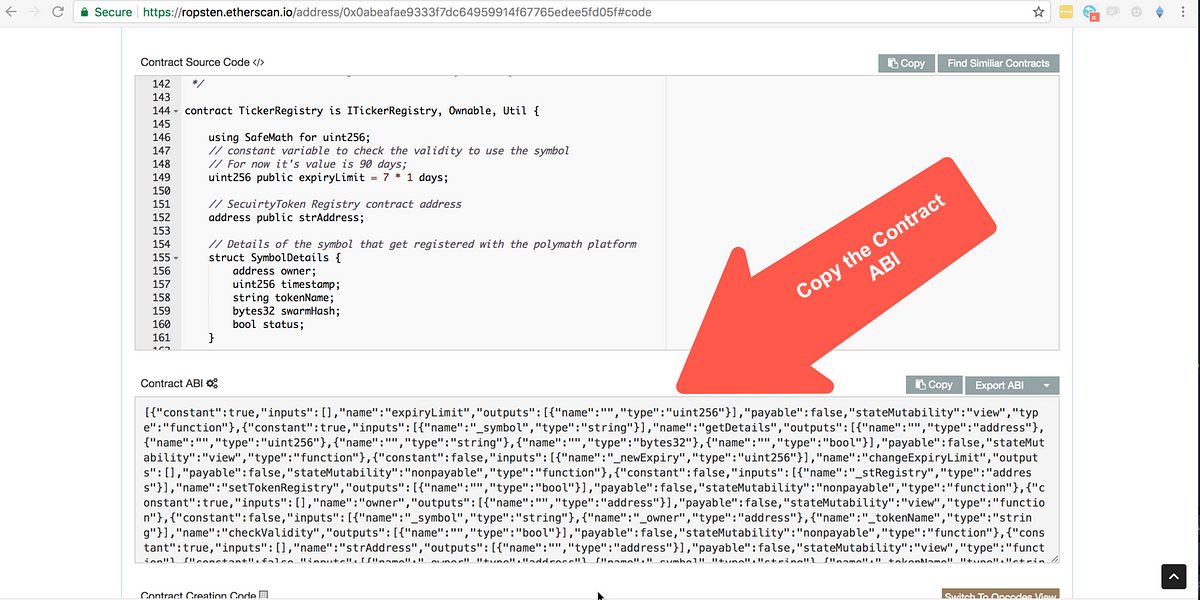
Let’s get the ABI of the TickerRegistry smart contract so we can register our token symbol with it. On Etherscan, look for the TickerRegistry contract address (0x0abeafae9333f7dc64959914f67765edee5fd05f) and select the “code” tab there. If you scroll a bit, you will see a section title “Contract ABI”. Copy the text in that box.
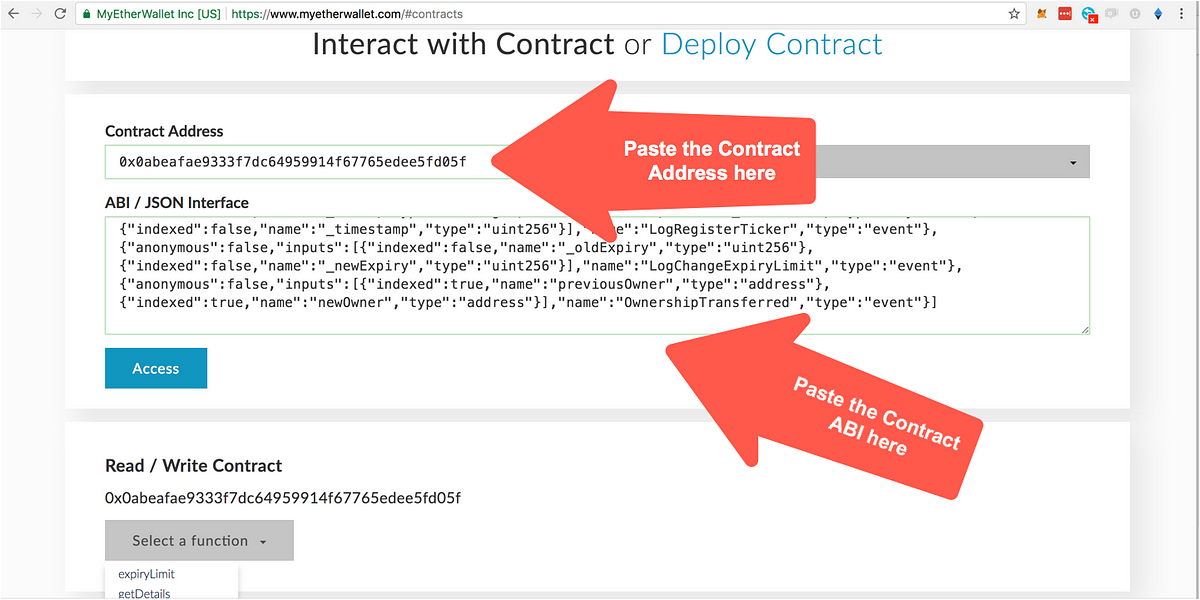
Step 5: Once you have the address and ABI of the contract you want to interact with, you can paste them into the contract section on MEW as we saw in step 3. Once you do that, you will be able to see the list of available methods. Selecting one of them will prompt you for entering the corresponding parameters (if any) that the method requires. For example, in the image below we can see what the PolymathTickerRegistry registerTickermethod looks like:
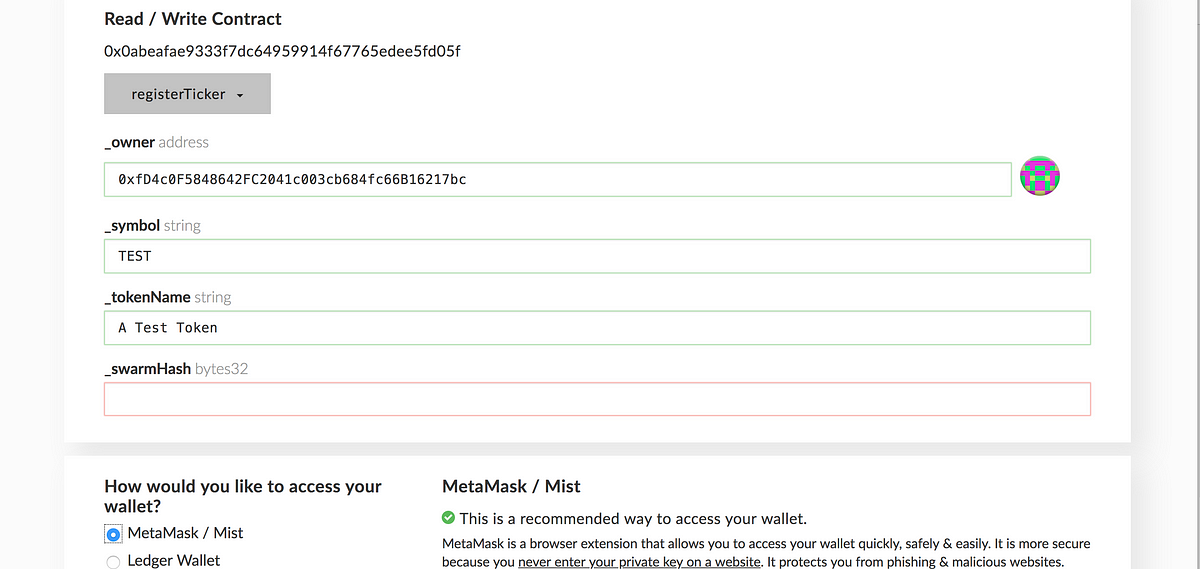
Step 6: The TickerRegistry, as we explored earlier in the guide, accepts 4 parameters. Fill them out with the data you want for your token (remember you can leave _swarmHash empty).
Once you enter the corresponding parameters, you will be asked how you want to sign the transaction. In this guide we’ll only use Metamask, but you could also sign your transactions with a hardwallet like Trezor. Choosing any of these methods will prompt you with the following screen:
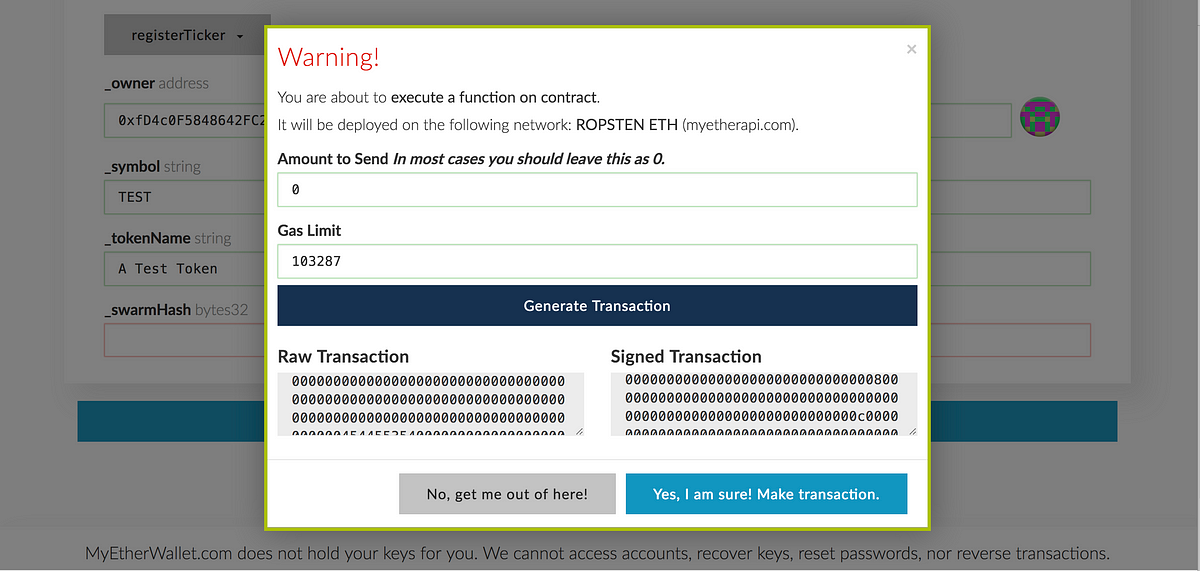
Step 7: If the method you are executing required sending some Ether to it, here’s where you would enter the amount. You can also provide a custom gas limit to the transaction, though it should be automatically calculated for you.
Leave those two fields as they are and just go ahead and click on “Generate Transaction”. That will create a signed transaction ready to submit with Metamask. When you are ready hit the “Yes, I am sure! Make Transaction” button. Don’t worry! We are working on a testnet and nothing bad can happen. Once you do that, you will be prompted by Metamask.
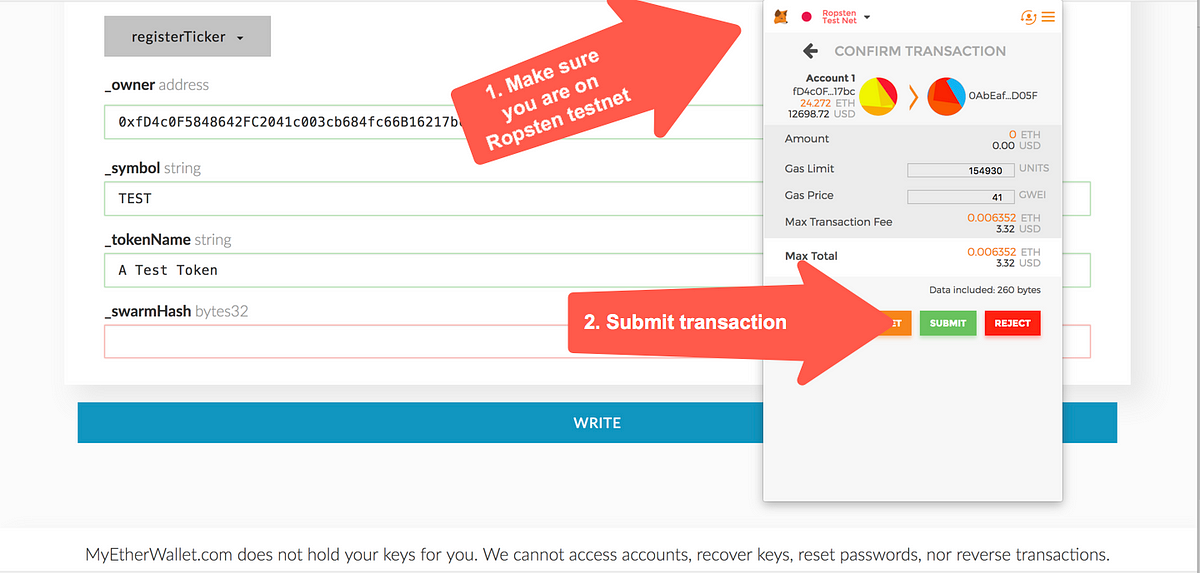
Step 8: You will get a prompt from Metamask asking you to review and confirm the transaction you just created. Make sure that Metamask is actually working on the Ropsten testnet, which it should say on the top of the popup. Once you ensure you are on Ropsten, click “Submit”. Doing so will finally send the transaction to the blockchain for processing. Sit tight! Depending on the status of the network this transaction can take between 15 and 40 seconds. You can see the progress of the transaction by clicking on it on Metamask, which will take you to Etherscan where you can see its status.
And that’s it! For each transaction that you want to make with a smart contract, you should follow the same steps as described in this section.
If you followed the steps above without encountering any problems, you should have the token symbol registered to the owner account you specified.
We are now ready to start using Polymath’s Toro smart contracts to deploy our own security token!
Before moving forward, let’s make sure you have your token symbol registered.
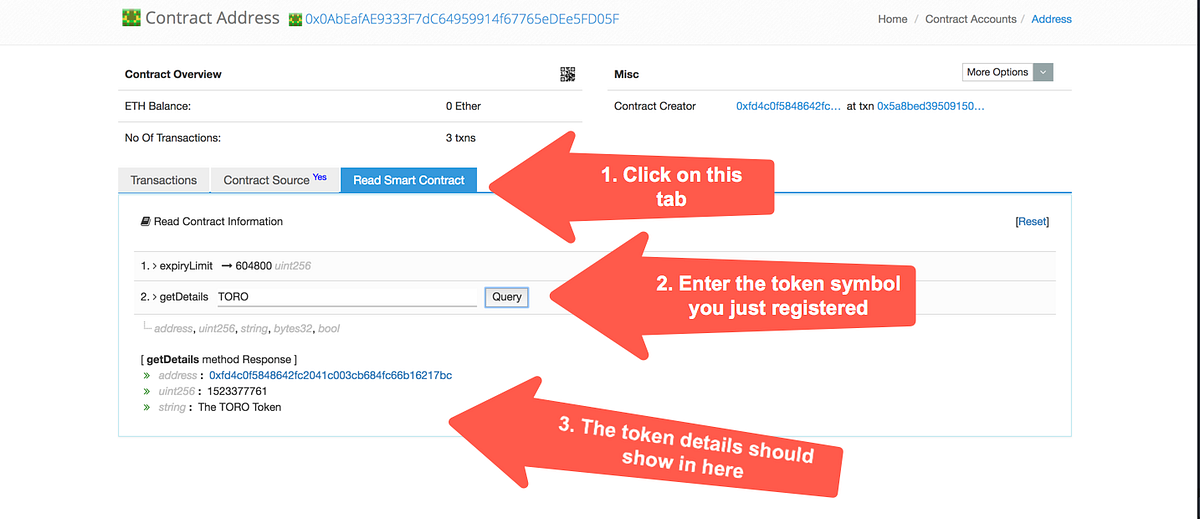
You should now be able to query the TickerRegistry contract for the token symbol you entered. Go to Etherscan and on the contract’s “Read Smart Contract” tab, enter your token symbol under the getDetails field. You should see something like the image below:
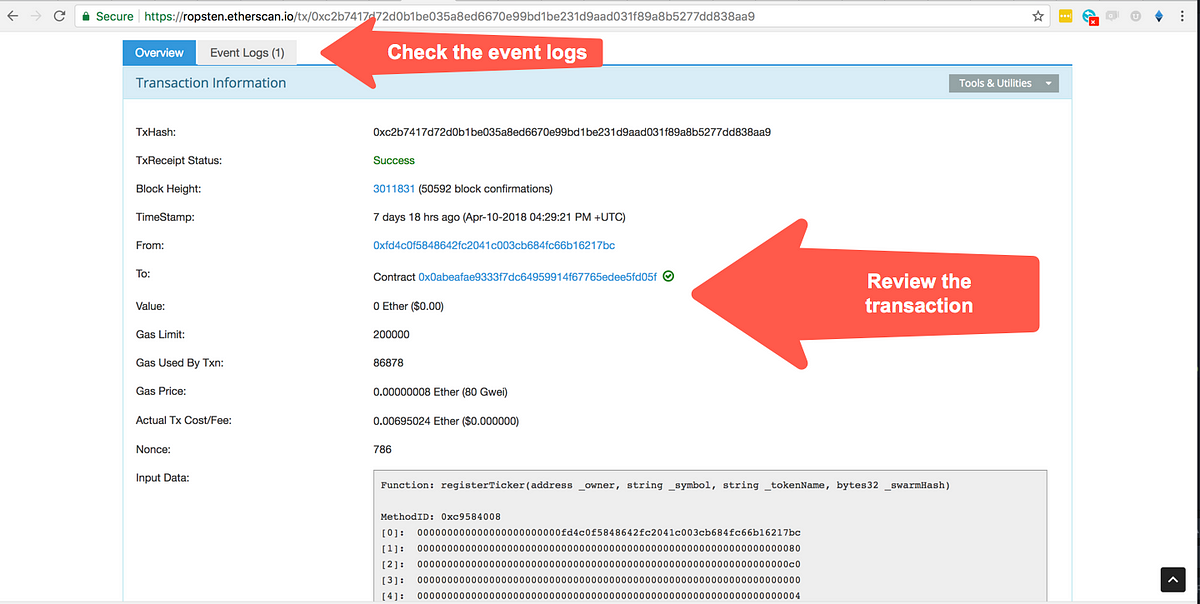
For additional information about the transaction, you can check the event logs. Typically, transactions include logs with additional data — though not every single transaction may do this, and some other transactions may write more than one event log. To see the event log for the registerTicker method, go back to the transaction information screen we were looking at just before and click on the “Event Logs (1)” tab.
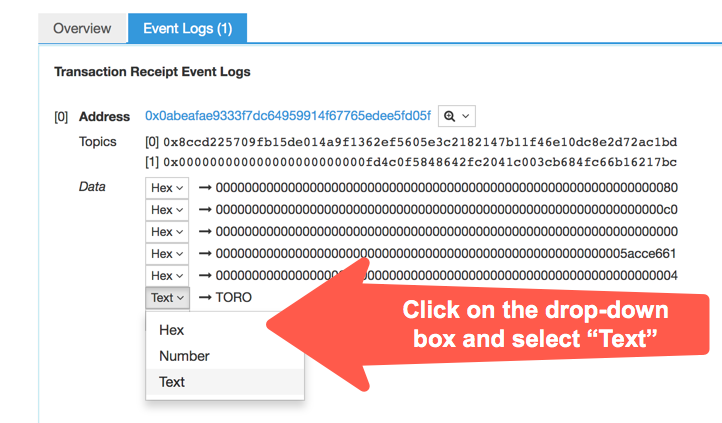
You will get to the screen pictured above where you will be able to see the data that the event logged. What data is logged by a transaction is defined by the developer of the smart contract, so what you see above may differ from contract to contract. All values are shown in hex by default, but you can select them and change how you want each value displayed. Event logs may be shown differently for each particular event (items arranged in different order) so it’s hard to tell which data field is the one you are looking for.
Now that we have our token symbol registered, the next step is deploying the actual Security Token! Remember you only have 7 days to do so or you’ll lose the token symbol you reserved. Don’t sleep on it! 😴😴😴
Deploying the Security Token
In the previous step we got our token symbol registered so we could at least secure it while we figure out the details of our issuance. Keep in mind that issuing a security token is a multi-step process that can take weeks or even months, so being able to secure your unique symbol is at least a great way to get started.
This delay between reserving a token symbol and deploying the token to the blockchain is by no means a technological limitation, but rather, it has to do with the fact that in a real-life scenario, there are generally many internal discussions regarding a token issuance that take time. The issuer may have to consult with several law firms, gather all the pertinent documentation, and review all the details with the company’s board and partners, amongst other things.
Since this is only a demo environment, we made it so the symbol expires in seven days after the registration, but don’t worry! On mainnet we intend to extend this deadline.
So, we have our token symbol and we are ready to move to the next step, deploying the token. Here’s where the SecurityTokenRegistry comes into play.
The SecurityTokenRegistry is a smart contract responsible for deploying the corresponding SecurityToken contracts and keeping track of them so we conserve their uniqueness.
If you recall, the SecurityToken contract is our implementation of the ST-20 interface, which is an extension of ERC-20 with restricted transfers.
The SecurityToken can have many different versions as we keep improving our protocol, so the SecurityTokenRegistry is responsible for deploying the latest stable version of the SecurityToken contract we make available.
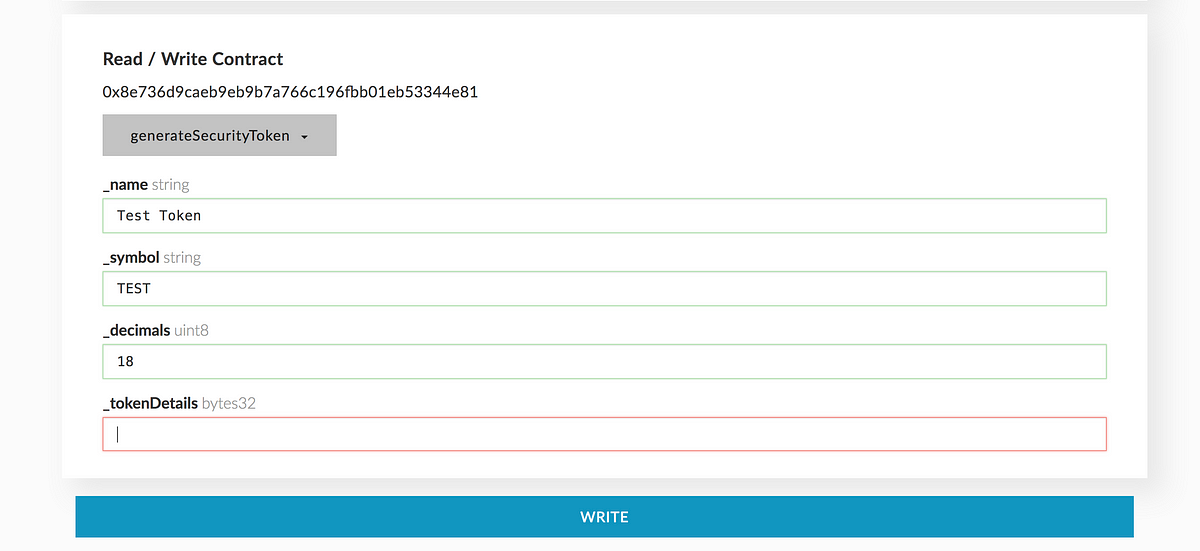
Deploying a SecurityToken requires the owner of the token symbol to call the generateSecurityToken method on the SecurityTokenRegistry (0x8e736d9caeb9eb9b7a766c196fbb01eb53344e81) contract:
The generateSecurityToken method receives 4 parameters:
string _name: The name of the token being registered. For example: The Toro Company. Can be different from what was entered on the TickerRegistry. What is entered here is final.string _symbol: The token symbol to register. It has to be the exact same token symbol as entered on the TickerRegistry.uint8 _decimals: The token decimals for the token. Generally, 18 decimals.bytes32 _tokenDetails: Used to store additional off-chain data if ever needed. Can be empty.
Go ahead and execute this transaction just as we did in step 1.
- Get the ABI from the contract on Etherscan.
- Paste it in the “contracts” section in MEW alongside the contract address.
- Select the method you want to execute on the smart contract (
generateSecurityToken). - Complete the corresponding fields with the data for your token.
- Follow MEW’s prompt to generate the transaction.
- Submit the transaction on Metamask when it pops up.
Once this method is executed, a new token will be deployed to the blockchain. You can get the address by inspecting the transaction you submitted from Metamask. Open that transaction on Etherscan by clicking on it from the list on Metamask, and head to the “Internal Transactions” tab. You will see something like this:
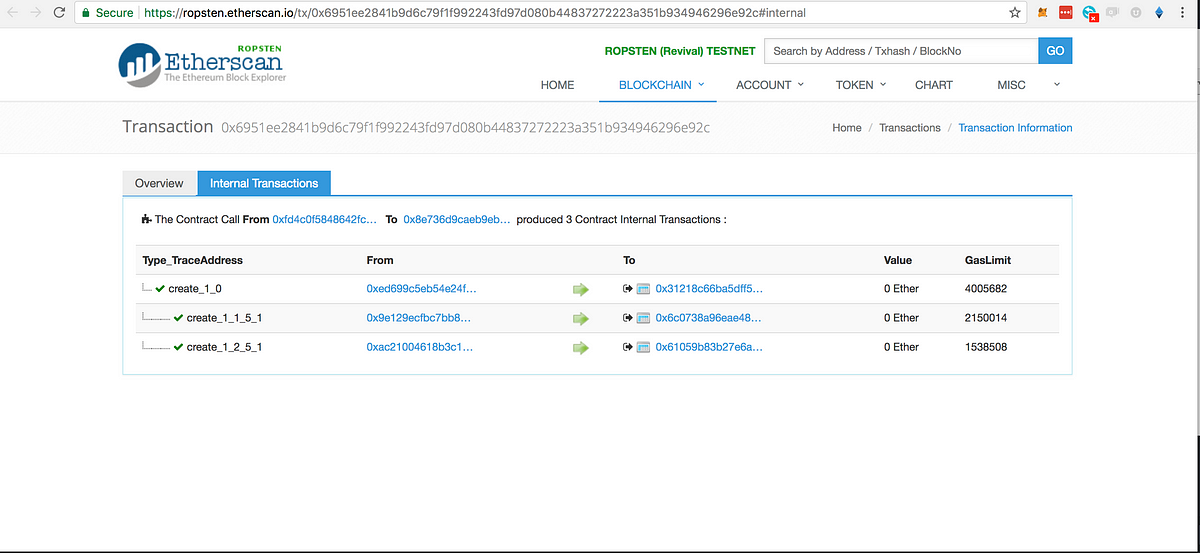
Since the generateSecurityToken method does a few things behind the hood, you will see a few internal transactions when you inspect it. The one that interests us right now is the first one which resulted in the token being deployed.
If you click on the “To” address of the first transaction you will reach the SecurityToken contract that has been deployed. Copy this address, as we’ll use it throughout the rest of the guide.
Congratulations! Your own regulatory-compliant security token is now live on Ethereum testnet! 🎉🎉🎉
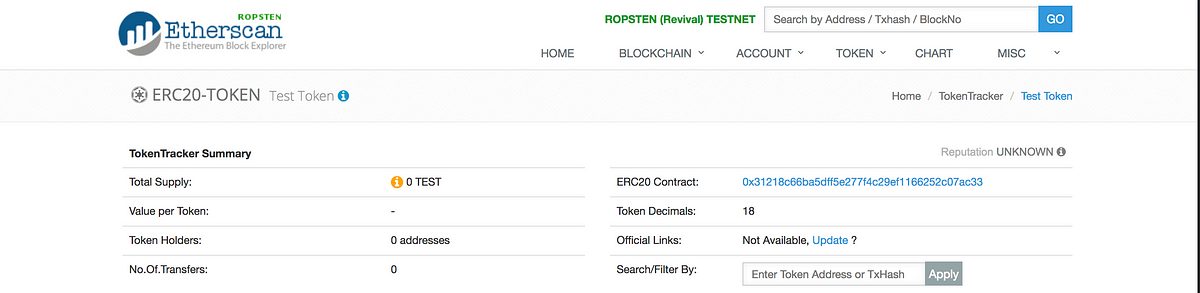
If you check the token on Etherscan, you will notice that the token is there, but its total supply is 0 tokens. That’s because SecurityToken is actually a mintable token. That means that tokens will be minted on an “as-needed” basis when requested.
Before an STO is launched, the owner of the Security Token may mint any amount of tokens they want to distribute to themselves or others. Once the STO module is attached, the only entity capable of minting tokens will be the STO, which manages how those tokens are to be created and distributed.
That’s it for today! In this first part of the step-by-step guide we successfully registered a token symbol and deployed it to Ropsten testnet while learning how to interact with smart contracts using Metamask and MyEtherWallet.

WorksHub
Jobs
Locations
Articles
Ground Floor, Verse Building, 18 Brunswick Place, London, N1 6DZ
108 E 16th Street, New York, NY 10003
Subscribe to our newsletter
Join over 111,000 others and get access to exclusive content, job opportunities and more!